If you have cracked or damaged bathroom tiles, repairing them yourself can be a cost-effective solution that doesn’t require professional assistance. With some basic tools and a little know-how, beginners can successfully tackle bathroom tile repairs. Here are the best DIY techniques for repairing bathroom tiles, specifically designed for those new to tile repair.
1. Assess and Prepare
Before starting any repairs, assess the damage to determine the scope of the repair. Note any loose or damaged tiles that need attention. Gather the necessary tools such as a grout saw, putty knife, tile adhesive, replacement tiles, grout, and a sponge.
2. Removing Damaged Tiles
To remove damaged tiles, follow these steps:
- Use a grout saw to carefully remove the grout surrounding the damaged tile. Be patient and gentle to avoid damaging neighboring tiles.
- Once the grout is removed, insert a putty knife under the tile and gently pry it away from the wall or floor. Take care not to damage surrounding tiles.
- Clean the area thoroughly, removing any remaining adhesive or grout.
3. Installing Replacement Tiles
Now that the damaged tiles are removed, it’s time to install the replacement tiles:
- Apply a thin layer of tile adhesive to the surface using a notched trowel.
- Place the replacement tile firmly into the adhesive, aligning it with the surrounding tiles. Wipe away any excess adhesive.
- Allow the adhesive to dry and set according to the manufacturer’s instructions.
4. Grouting
After the adhesive has fully dried, apply grout between the tiles:
- Prepare the grout according to the manufacturer’s instructions.
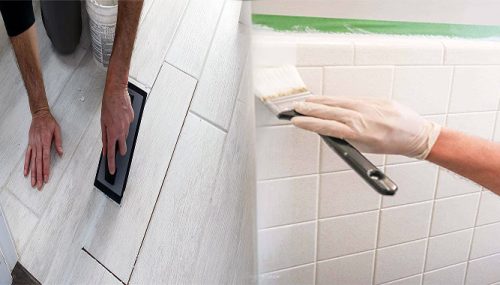
- Use a grout float to spread the grout over the tile surface, pressing it into the gaps between tiles.
- Wipe away excess grout using a damp sponge, being careful not to remove too much grout from the gaps.
- Allow the grout to dry and cure fully before using the shower or space.
5. Sealing
To protect your newly repaired tiles and prevent future damage:
- Apply a tile sealer to the grout lines and tile surfaces once the grout has fully cured. This will help repel stains and water.
- Follow the manufacturer’s instructions for the application process and drying times.
Tips for Success
Here are some additional tips to help beginners achieve successful bathroom tile repairs:
- Safety First: Wear safety goggles and gloves when working with tools or cleaning solutions.
- Take Your Time: Rushing the repair process can lead to mistakes. Be patient and give yourself enough time to do the job properly.
- Do Your Research: Watch tutorial videos or read step-by-step guides to familiarize yourself with the repair process before starting.
- Practice on Spare Tiles: If you’re new to tile repair, practice on spare tiles or scrap pieces to build confidence before tackling the actual repair.
By following these best DIY bathroom tile repair techniques for beginners, you can save time and money by successfully fixing cracked or damaged tiles in your bathroom. Remember to take it slow, be cautious, and don’t hesitate to seek professional help if the job becomes too challenging. Happy repairing!